


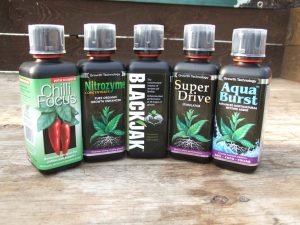
It is often common practice to add a few extras to the soaking water so there are some goodies waiting for the plants as roots start to emerge, right from the start. My usual soaking mix contains ¼ strength Chilli Focus, Nitrozyme seaweed extract, Blackjack humic & fulvic acid, Superdrive vitamin supplement and Aquaburst wetting agent all diluted in to clean filtered and de-chlorinated water. Place the dry discs into a tray and fill to approximately 20mm with solution. Don’t worry if the plugs get too wet as a gentle shake can shed the excess solution. I would do the same for Root Riot except you don’t have to wait for them to soak up the solution. These bio spongy blocks are just like little sponges and can be treated as such, a quick soak and a squeeze and they are ready to go. Rockwool blocks need to be soaked in a slightly more acidic solution to counteract the alkaline rockwool. These are horticultural rockwool blocks, not loft insulation which is glasswool and non-wettable. Soak rockwoll in a solution that has a pH of 5.5. This will bring the rockwool to a pH of 6.5. In all other cases use a solution pH of 6.5. Your plugs are ready to go into your propagator.
Cell trays, pots or a seed tray: fill them with growing media using a medium grade sieve to remove any lumps as required. If using general-purpose compost add 10% perlite to the sieved mix before filling cells or pots. Water them in before sowing seeds. The best way to water your trays and pots is to stand them in a shallow garden tray and fill to a depth of approximately 20mm with solution and allow to soak evenly and well. You can use the same soaking mix as mentioned above. Once soaked remove the tray or pots and allow to drain briefly before placing in the pre-prepared propagator. If using fibre cell trays, stand them in the pre prepared propagator before soaking and water in from the top well. These are hard to handle when wet but not an issue later on.
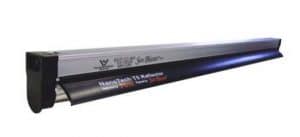 Fluorescent T5 is by far the most popular and multi-purpose form of propagation lights. These are fluorescent tubes of the T5 diameter often referred to as ‘strip lights and come in single strips with reflector and starter, like the SunBlaster units, or in canopies of multiple tubes such as the Maxibright T5 units. Most commonly these are all supplied with blue spectrum tubes, 6500k, as standard. Red spectrum tubes, 2700k, are available too. Both the Maxibright units and SunBlaster units use the high output (HO) version of the T5 tubes as these have a higher light output than the standard tubes length for length. T5 are extremely reliable, excellent value for money to purchase and run, and most importantly they grow great plants. T5s can be used on multi-level rack systems due to their slim design and cool running temperature. A single T5 will give a usable even spread of approximately 15cm at a height of 15cm down the length of the tube. It’s possible to cover more area but growth will start to become uneven. Because T5s run cool, plants can be grown close to the tubes but be wary of damage to touching leaves and the lack of humidity directly around the tubes. Replacement tubes are widely available and reasonably cheap – My advice would be to always choose a quality branded replacement tube such as Sylvania, Osram or Phillips.
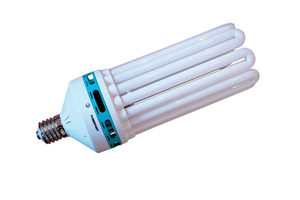
Compact Fluorescent Lamps or CFLs as they are referred to are probably best described, albeit incorrectly, as ‘giant energy-saver bulbs’. They are a cluster of U-shaped fluorescent tubes mounted vertically in a circle. The U-tubes are stuck together and mounted directly onto the starter unit with the E40 screw end on the other side. CFL grow lamps are widely available in wattages of 125w, 150w, 200w, 250w and 300w, but others do exist. Available in blue or red spectrum and some of mixed blue/red spectrum. Blue is the usual preferred colour for propagation and growing on. CFL lamps need to be screwed in to a purpose made reflector that plugs directly into the mains socket outlet and has an E40 lamp holder. A lamp holder and lead set can also be used to hang lamps vertically. Although a good light source, CFLs can be less reliable than other forms of lighting and because of their fragile design they are easy to break. If they do break of fail they are more expensive to replace because the tubes and starter together form a single unit and have to be replaced as such. The spread of light is less efficient due to the design configuration of the tubes and better, more even coverage can be gained by other forms of lighting for the same wattage used. A 300w CFL is not a small light for propagation and they are not as cool as you think, far from it. If you are looking at something that uses 300w of electricity you might want to consider other, better options.
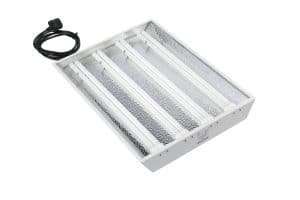 Fluorescent PLL in my opinion are a better choice than CFL. These are a 550mm long 55w double tube that plugs in at one end only. The other end is supported by a clip. As a grow light, these tubes are sold in a canopy either as a twin tube (110w) or quad tube (220w) unit with the tubes mounted side by side much like a T5 unit. The PLL tube is a high output fluorescent tube and available as a blue, mixed or red spectrum balance. In my experience the mixed are the better choice, colour code 840. Replacement tubes are reasonably cheap and cost a little bit more than T5 but not by much.
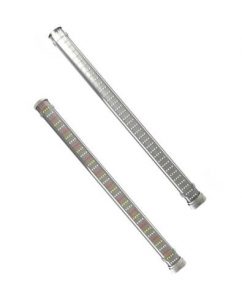 For the most part, LEDs are worth avoiding especially all the cheap rubbish you see on Amazon sold under the pretence as being suitable for growing plants or for ‘hydroponics’. Most of this is unreliable, remarketed general lighting that is falsely advertised, doesn’t do what is claimed and is not of the specification presented. It’s sold by foreign manufacturers and importers looking for any market possible with little or no product support. It wouldn’t surprise me if some of these items were a danger to use and a fire hazard. Among the vast array of detritus you can actually find some good, safe, well made and supported LED units that are reasonably priced and great for propagation. One such item is the TLED from Secret Jardin. These are multi-LED batons, 26 watts, 550mm long, 6500k colour temperature from 144 x Super Nova LEDs. These units are very reasonably priced, reliable and plants grow very well under them.
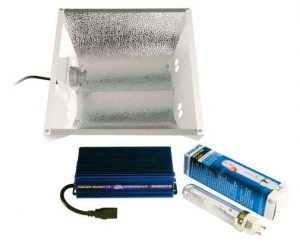 You might be under the impression that these excellent grow lights are too powerful for propagation or get too hot. Well, in some situations Metal Halide is an ideal choice and you might be surprised at how cool the lower wattage units can be. They are by far the best lights for growing on as the plants get bigger while waiting to go out into the greenhouse or outside, and if you are considering a CFL light unit then watt for watt metal halide is far superior Metal halide will cover larger areas than fluorescents, CFLs or LED lights and can be used for all stages of vegetative growth. Best of the bunch, and costing a bit more, is the Philips Daylight CDM 315w which produces near complete daylight spectrum, is really efficient, much cooler than HIDs of equivalent wattage and cheaper than any comparable LED (if there is such a thing). Your plants would choose this light! Look out for the Maxibright Daylight units as they offer the best value for money (half the price of other brand units), use all Phillips components and lamps, use remote digital ballast and have a good choice of reflectors to suit everyone.

